

[Editor's Note: Since first publishing this guide in 2016, this LEGO parts tracking system has become one of our most referenced posts. While the core method remains incredibly effective, I've updated this guide with newer tools and new tips to make tracking your needed LEGO parts even easier.]
As you may know, we used to sort LEGO bricks for another eBay seller and in return, he paid us in LEGO bricks. We then turned around and pieced together sets to sell on eBay as well. Since sets can have a multitude of pieces, I developed a system I use to create what I like to call a "needed LEGO parts list".

It's been a while since I've done this, as I haven't had much time to go parts hunting since I started my current role back in 2016. Recently though I'm feeling more interest in putting together the crazy amount of sets for which I had collected parts. I'm constantly faced with them when I walk into the garage or when I'm sitting in our LEGO room. I think the mental overhead of the lingering "LEGO to-do list" project is finally getting to me!
Previously though, when I showed other AFOLs my list, I was usually met with plenty of "oohs" and "aahs". As there had been more than one PeachLUG member who showed interest in my system, I thought I'd share with you how I go about creating my needed LEGO parts list.
How To Create a Needed LEGO Parts List
Whether you're piecing together a single set or juggling multiple builds, having an organized system for tracking needed parts is essential. While there are now many digital tools available for LEGO builders, this spreadsheet-based system remains popular because it's both powerful and flexible. It works offline, can be customized to your needs, and most importantly, helps you keep track of exactly what pieces you need across all your builds.
In this updated guide, I'll walk you through creating your own parts tracking system, including recommendations for tools that can make the process even more efficient.
And honestly, there's really not much to it aside from doing a little copy and pasting into a spreadsheet. Here's how I go about making my list:
Step 1 - Open a worksheet

While any spreadsheet program will work, I've found Microsoft Excel particularly valuable for this system due to its powerful merging capabilities. This becomes especially helpful when tracking parts across multiple sets. If you'll be managing numerous sets, the one-time purchase of Excel can save hours of manual work.
For those who don't want to fork out the money for an annual subscription, you can also use Google Sheets. The disadvantage here is that, unless you are willing to fork out some money here as well to purchase an add-on to merge your sheets, you'll spend some time doing a little copy-paste action.
There are, of course, other options for you to use (Numbers on Mac, OpenOffice, etc...) Pick your flavor, any of them will work.
Step 2 - Look up your set on Rebrickable.com

If you haven't run across it before, Rebrickable is an excellent tool for LEGO enthusiasts. Its main goal is to help you find other sets you can build from the sets you own, but you can also use it for a multitude of other things, like in our example, getting a full parts list for a set.
FYI - Rebrickable also has a similar LEGO parts list functionality; however, its use is tied to your ability to access the internet. For those times when you don't have internet access, having your own list that you can place in an easily accessible location, makes it tons easier to work with. I also find it quicker and easier to simply remove an item I no longer need from my list than I do from Rebrickable. When you're working with a LEGO parts list with over 1000+ entries, ease of use is of the utmost importance.

Using the search function at the top of the page, you can pull a detailed listing of your set from Rebrickable. For my previous example, I used LEGO Robin’s Scuba Jet: Attack of The Penguin Set (7885) for my spreadsheet example. This set is now retired and close to $350(!!!) on the aftermarket, so let's work with a newer set with less pieces.

To get what I needed, I searched for "30701" on Rebrickable for the LEGO Field Flowers polyset (now available at your local Target or Walmart or on Amazon) and clicked the item in the search results dropdown.

If you don't find it in the drop down, you can click the Search button. Rebrickable will return a list of items matching your search term. Their focus is selling MOCs for builders, so don't be surprised to see MOCs returned as the first search result. You'll see official LEGO sets as the second search result, followed by matching parts.
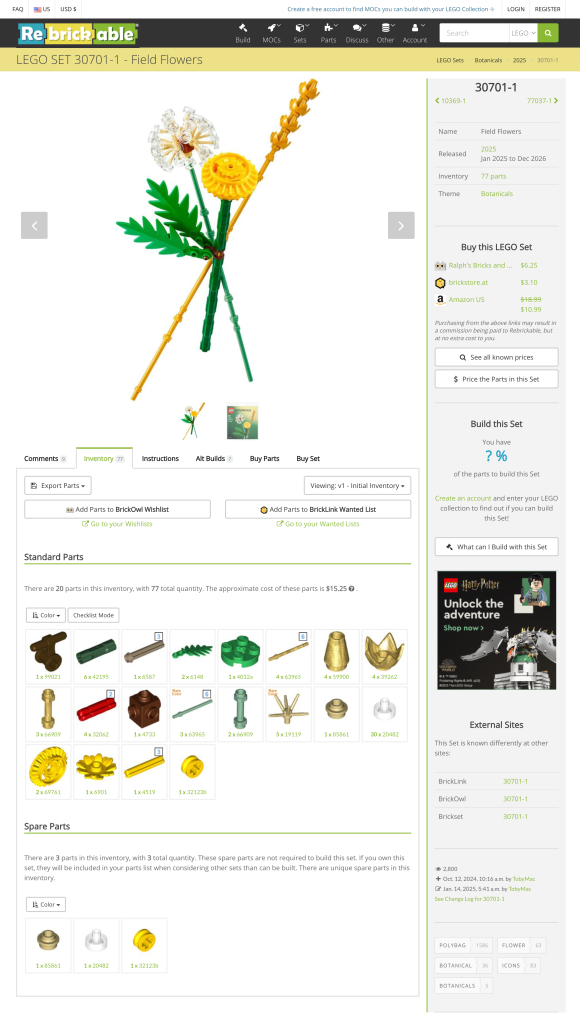
Once you drill down to the set you need, you'll be presented with a page with tabbed sections. Click the "Inventory" tab and your page will look like the one above.
Step 3 - Copy/Paste the inventory list into your spreadsheet
This section is a tad big, so we're going to break it down into substeps.
Getting Your Initial Data
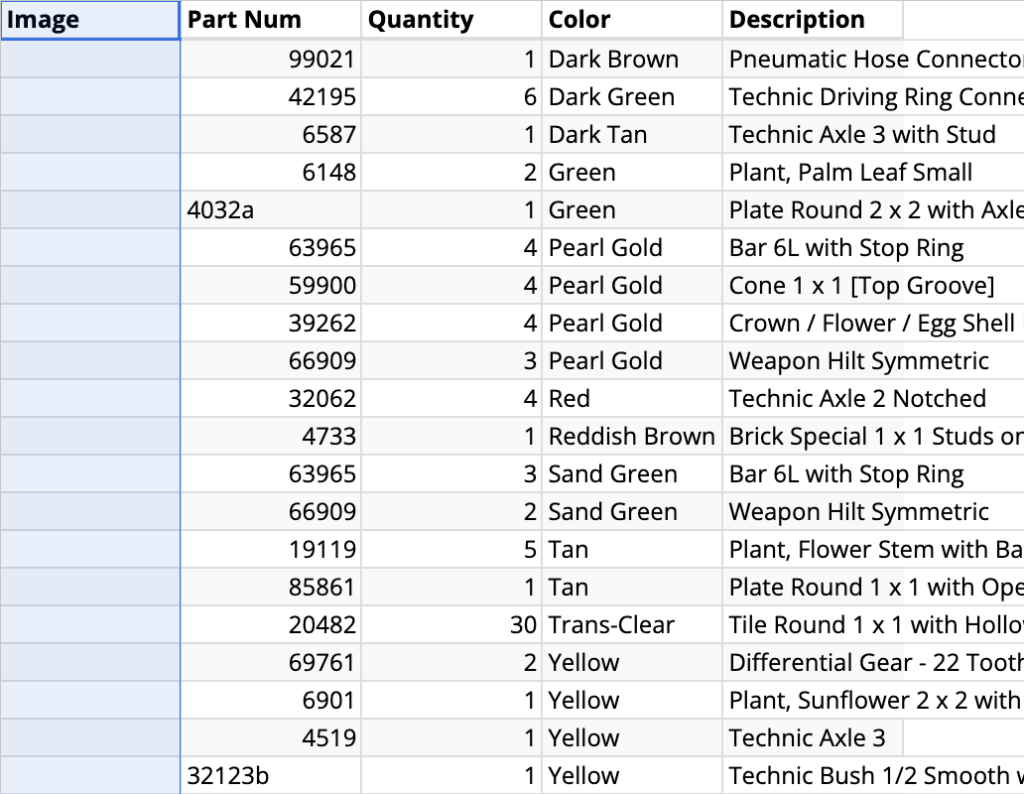
- In the "Inventory" section for the set, you will see a button titled "Export Parts".
- Click the drop down and select the "HTML Table" option. (I recommend you open the link in a new browser window/tab.)

- At this point, if you do not have an account with Rebrickable, you'll need to create one. Fortunately, they have a basic account which is free! Once you do, come back to this step. I'll wait.
- Clicking on the "HTML Table" link will take you to a page with a parts list for the set in HTML format. From here, you can copy and paste your set list from the HTML table to the spreadsheet.

Adding Part Images
Previously, I had a section that discussed getting the images to copy/paste into your spreadsheet. Sometime in the past few years, technology has moved along (imagine that) and I found that none of the images would paste into the spreadsheet.
- Fortunately, I was able to snag a formula that is able to pull the image from LEGO directly. In order for this to work, you also need to download the "LEGO Pick-A-Brick CSV".

- Once you've downloaded the file, import the CSV as an extra sheet in your workbook.

- Copy and paste the content of the CSV tab into the HTML Table sheet. In my example, the sheet is called "Field Flowers 30701". Your spreadsheet will now look like this:
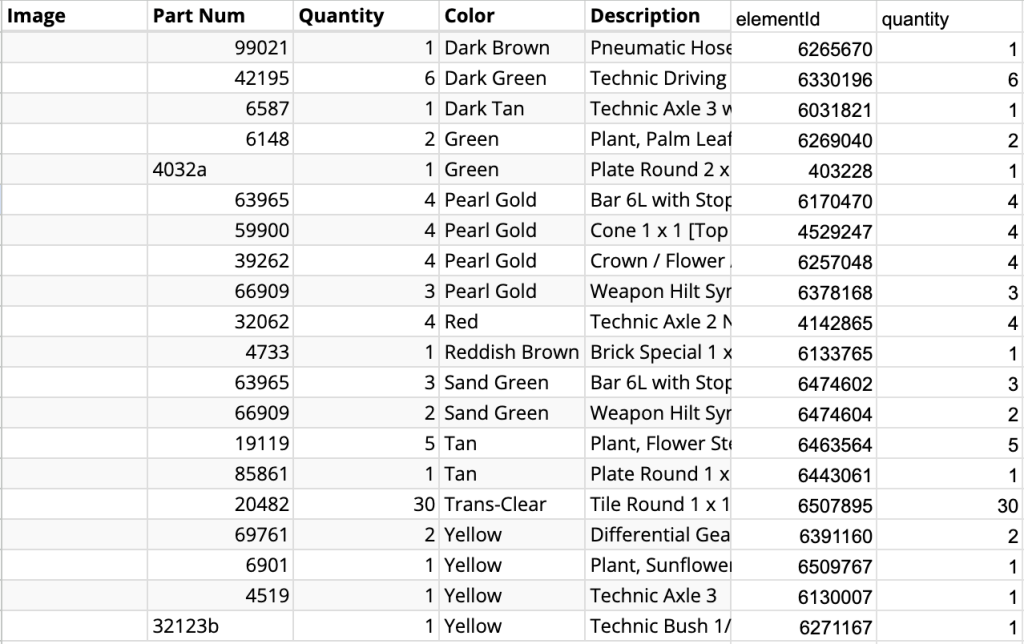
- Next, copy and paste this formula into cell A2. Drag the value down to fill all the fields with data.
=image(concatenate("https://www.lego.com/cdn/product-assets/element.img.lod5photo.192x192/",F2,".jpg"),4,60,60)This will add images for each of the parts you have listed.

Making Your Sheet Internet-Proof
Now, you never know when technologies change and shift, so I always recommend that if your goal is to create an internet-proof sheet with visuals, you need to reduce your reliance on anything that requires internet.
This particular formula works by pulling the image from the LEGO CDN. You don't want to continue doing that, so the next step you should take is making a copy of the image in your worksheet.
These instructions are specific to Google Sheets, but I'm sure you can do the same with Excel:
- While in column A, insert 1 column left of column A.
- Copy column B, which should now show the images.
- While selecting column A, use Paste Special > Values Only to make a copy of the images.

- Delete column B.
You can now download a copy of this spreadsheet to any non-internet connected device to help you keep a list with you while you go parts hunting!
Final Spreadsheet Setup
But wait... we're not done!
- At the bottom of your spreadsheet, you'll end up with the above row. You can just delete it from the spreadsheet.

- I then add an additional column, titled "Set", to which I add the set name so I can associate the part with its set.

- Once you've done all that, this is where all the magic begins. Here, you can sort your spreadsheet by column name. My recommendations are:
Color, then
Description
This helps keep all bricks, plates, hinges, etc...together in a section, which is similar to how Rebrickable sorts their list. This will also come in handy later on so you can easily see how many pieces you need to pull and to which sets they belong.
Step 4 - Merge the spreadsheets into one
You could stop at Step 3 but if like us, you are collecting large quantities of pieces, you'll find it useful to take all of your sheets and create a master merged list. Again, this is the part where I wish I owned Excel. For those of you who do own Excel, you can simply merge all of your spreadsheets into one large spreadsheet for sorting and pulling purposes. The "how to" of that is more than I can handle here, but if you do a search for "merging Excel spreadsheets", you will find plenty of resources and helpful instructions to get what you need.
If like me, you use Google Sheets, you'll need to copy and paste from the set spreadsheet to the master spreadsheet. Make sure to delete your column headings after you copy over... or simply don't copy the column headings to begin with.
From here, I do a final sort to get the pieces to appear with like entries... and voila!
That is pretty much how I make my needed LEGO parts list!
Fantastisch, endlich eine Lösung für das endlos lange Suchen von fehlenden Legoteilen! vielen Dank und Grüße us Österreich
You’re welcome! So glad you found it helpful!
Thanks so much for this article. This is so helpful. I did have a little trouble with the formula =image(concatenate(“https://www.lego.com/cdn/product-assets/element.img.lod5photo.192×192/”,F2,”.jpg”),4,60,60) when using Excel. I found 2 slightly different formulas that worked. Either =IMAGE(CONCATENATE(“https://www.lego.com/cdn/product-assets/element.img.lod5photo.192×192/”,F2,”.jpg”), ,0) which keeps the image’s aspect ratio and fits it to the cell, or =IMAGE(CONCATENATE(“https://www.lego.com/cdn/product-assets/element.img.lod5photo.192×192/”,F2,”.jpg”), ,3,60,60) to specify the image size of 60×60.
Thanks again!
Hey Angela! I’ll need to look into why that happened.
Sure it’s just a difference between Sheets and Excel.
Thank you for sharing!